You awaken in a strange facility with only the vague idea of what your job is. You can probably guess what happens next.
This is a short project I made to teach myself the ins-and-outs of twine. It has 5 endings, some optional lore bits, and is overall very short. Instead of just talking about the finished product (mostly because it’s quite short), I’d like to actually delve into the process of making it. Tackling something new can be daunting so I hope that this little write up can help anyone on the fence to give it a try themselves. SPOILERS AHEAD! As I’ll be using some examples from the game to illustrate a few points.
Yes, You Should Know how to Code
“Coding” is a scary word. A lot of people think of the act of coding as typing a lot, but that’s arguably the easy part. When I say “you should know how to code” what I really mean is “know how computers understand code”.
To put it simply, code is nothing more than a checklist that Twine uses in order to do things. By default, Twine will display any text you put starting from the top down, line by line. It will also process code in the same way, going from the top down. This was something I personally already had experience with from college, as I’ve taken many classes that require Unity. Coding, especially in Twine, is less about remembering what every single bit of code does and more about how to organize your “checklist”.
Macros are your Best Friend
Coding in Twine (in my case with the default format, Harlowe) utilizes things called macros. These are simple pre-made instructions that can be used to dynamically alter text, hide or display certain info, and various other things. Macros are formatted like this:
(macro: instruction) [Text to display and/or more code to run]
Here’s a snippet of code used when you grab a drink from the cooler.

When you grab a drink, the first thing that the code does is (set:), which alters the variable $exposed to true. The set variable is especially important in CYOA games as it’s a simple way to track what the player has or hasn’t done. For example, the next thing the game does is run the (if:) macro. This runs anything in the brackets if what you are checking for is true. In this case, we want the player to have finished the intro before we run the code on the right. That code is just another (set:) macro that makes the player bigger. Lastly, we use (set:) once more to keep track of how many drinks the player has had. Because this is also in the brackets it will only run if the first (if:) macro detects that the player is no longer in the intro.
This snippet also shows how code is run from the top down. The first thing that happens is that $progress is increased depending on how many drinks the player has had. However, the code to increase that number is after $progress is increased, so the first drink increases it by 0 and then adds another drink to the counter.
Another important macro that I didn’t discover until late into my project is the (link:) macro, which looks like this:
(link: “Some Text”) [Some more text/code]
The (link:) macro uses the text in the quotation marks to make a, well, link. When it’s clicked, it disappears and any text/code in the brackets is displayed/run. This link is powerful, as it let’s you add intractable elements without needing to make an entirely new passage the player has to travel to. For example:

A lot of areas where you pick up an item check to see if you already have it, and if you don’t it displays some text and gives it to you. This is both really messy and also isn’t very clear about what the player is doing. You can use a (link:) macro to keep it clean and provide some interactivity.

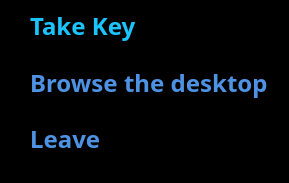
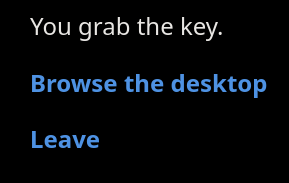
Because of this, a lot of the earlier locations I made are a lot messier than the passages that contain all the ending info.
Don’t Be Scared of Documentation
The Twine Cookbook contains a lot more info than a write up ever will, so if you do decide to try out Twine for yourself than I highly recommend you give it a look through.
Plan, Plan, Plan
A big issue I ran into was that I simply did not plan anything out. I had a cool idea of “what if you were a janitor and could clean up an infections spill” and decided that was enough of a plan to run with (it wasn’t). Even a rough outline of what you want the player to do helps a lot with knowing what needs to be done.
I was going to put the outline I eventually made here, but that would be too big of a spoiler even with a warning.
The Actual Hardest Part
Was the writing. Putting down a few lines of code is easy, especially when a lot of it is basically the same. The most time consuming part was the writing. How much detail do I want to go into about each location, how much time should I put into the optional lore bits, is what I have described enough for the player to get a clear mental image of the area they find themselves in? The endings especially took the longest, mostly because I wanted each one to be meaningfully different in some way. What about the text that’s used for traversing? Is “Head Back” clear enough to be the most used phrase in the game, or should I try and vary it up more?
Despite the fact that the game is pretty small in scope, it was a very insightful learning experience. I don’t have any plans on “remaking” or expanding the game, I think it stands on it’s own as a “first twine project”, though some lessons were certainly learned while making it. If you made it this far, thank you for taking the time to check out my project, and if you were on the fence on whether you wanted to start your own project I hope you decided and experiment like I had.