Rawethewolfs tips to create a soft body character in Blender

For context this is a brief explanation on how I did a soft body character animation. This explanation is from the weight gaming discord server.
Just in case, some might rate it for the more mature audience. Link to example: https://twitter.com/RaweWolf/status/1635042437726113793?s=20

I will try to make it short for the chat. I have a long version and a rewritten version of that one, that I guess is clearer. The long version also explains more in depth of why everything is done in the way I did it. It is difficult to keep it short and written in a way so everyone can understand it without making it boring. I tried my best xD.
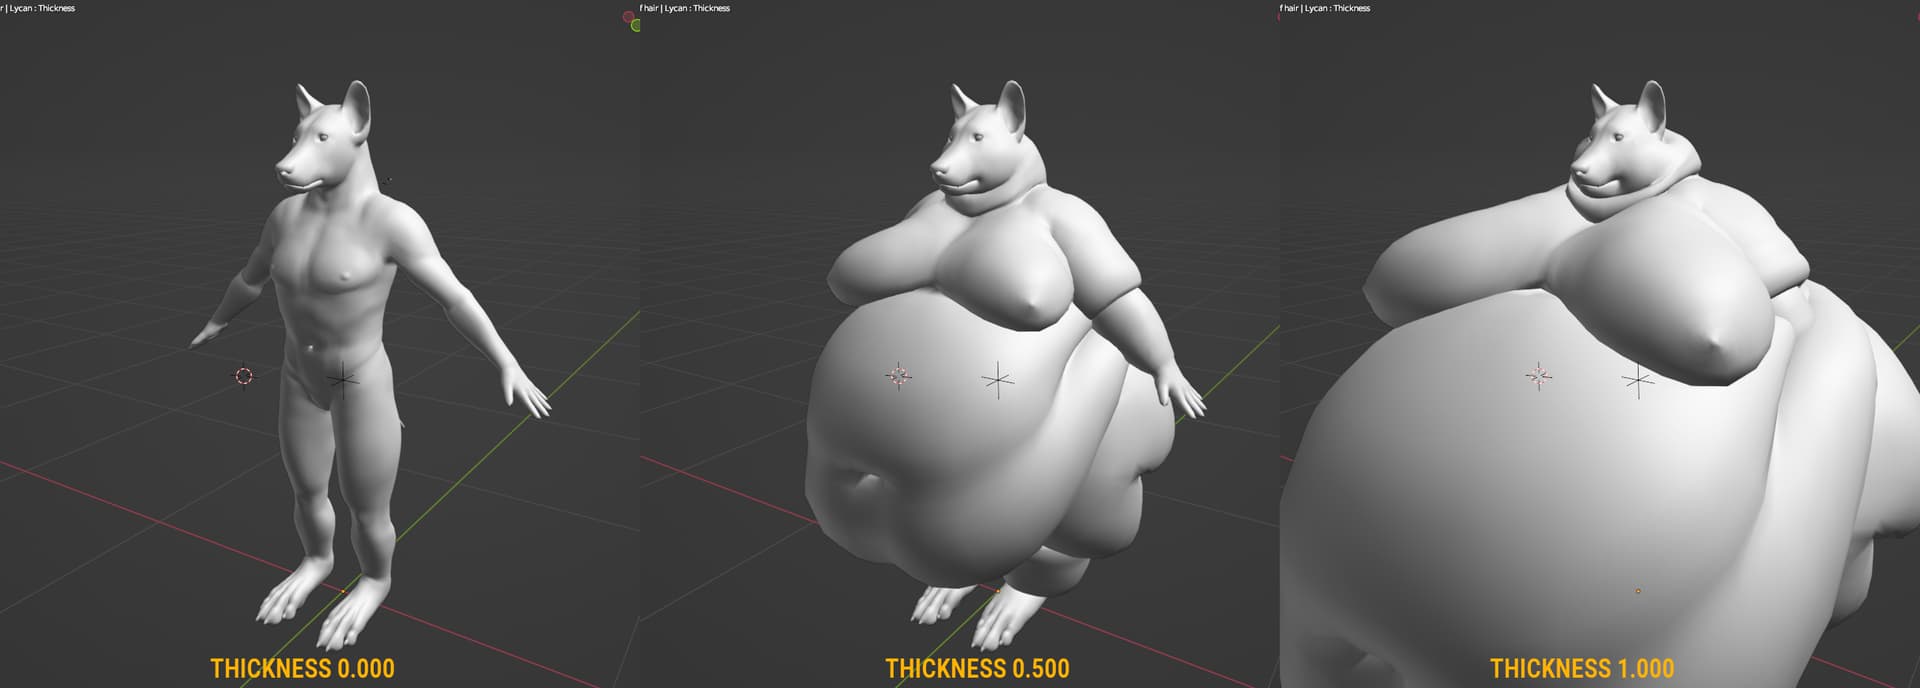
Okay, here goes. I made myself an anthro wolf character that I can use for all sort of stuff. Originally the character is made to be used in a game engine, so it is a mid poly model consist of about 15.000 polygons, the inner mouth and eyes are excluded in the polygon count. The model has gone through many iterations to have the best mesh for extreme expansion and cloth physics. The shape key, I named ‘thickness’, is something I have spent a lot of time on. I had to find the right blob body shape that looks good in all the steps between thin to blob while it deforms well for the rig. Other shape keys I gave it, is to modify the body as needed, like gender, fullness and so on.

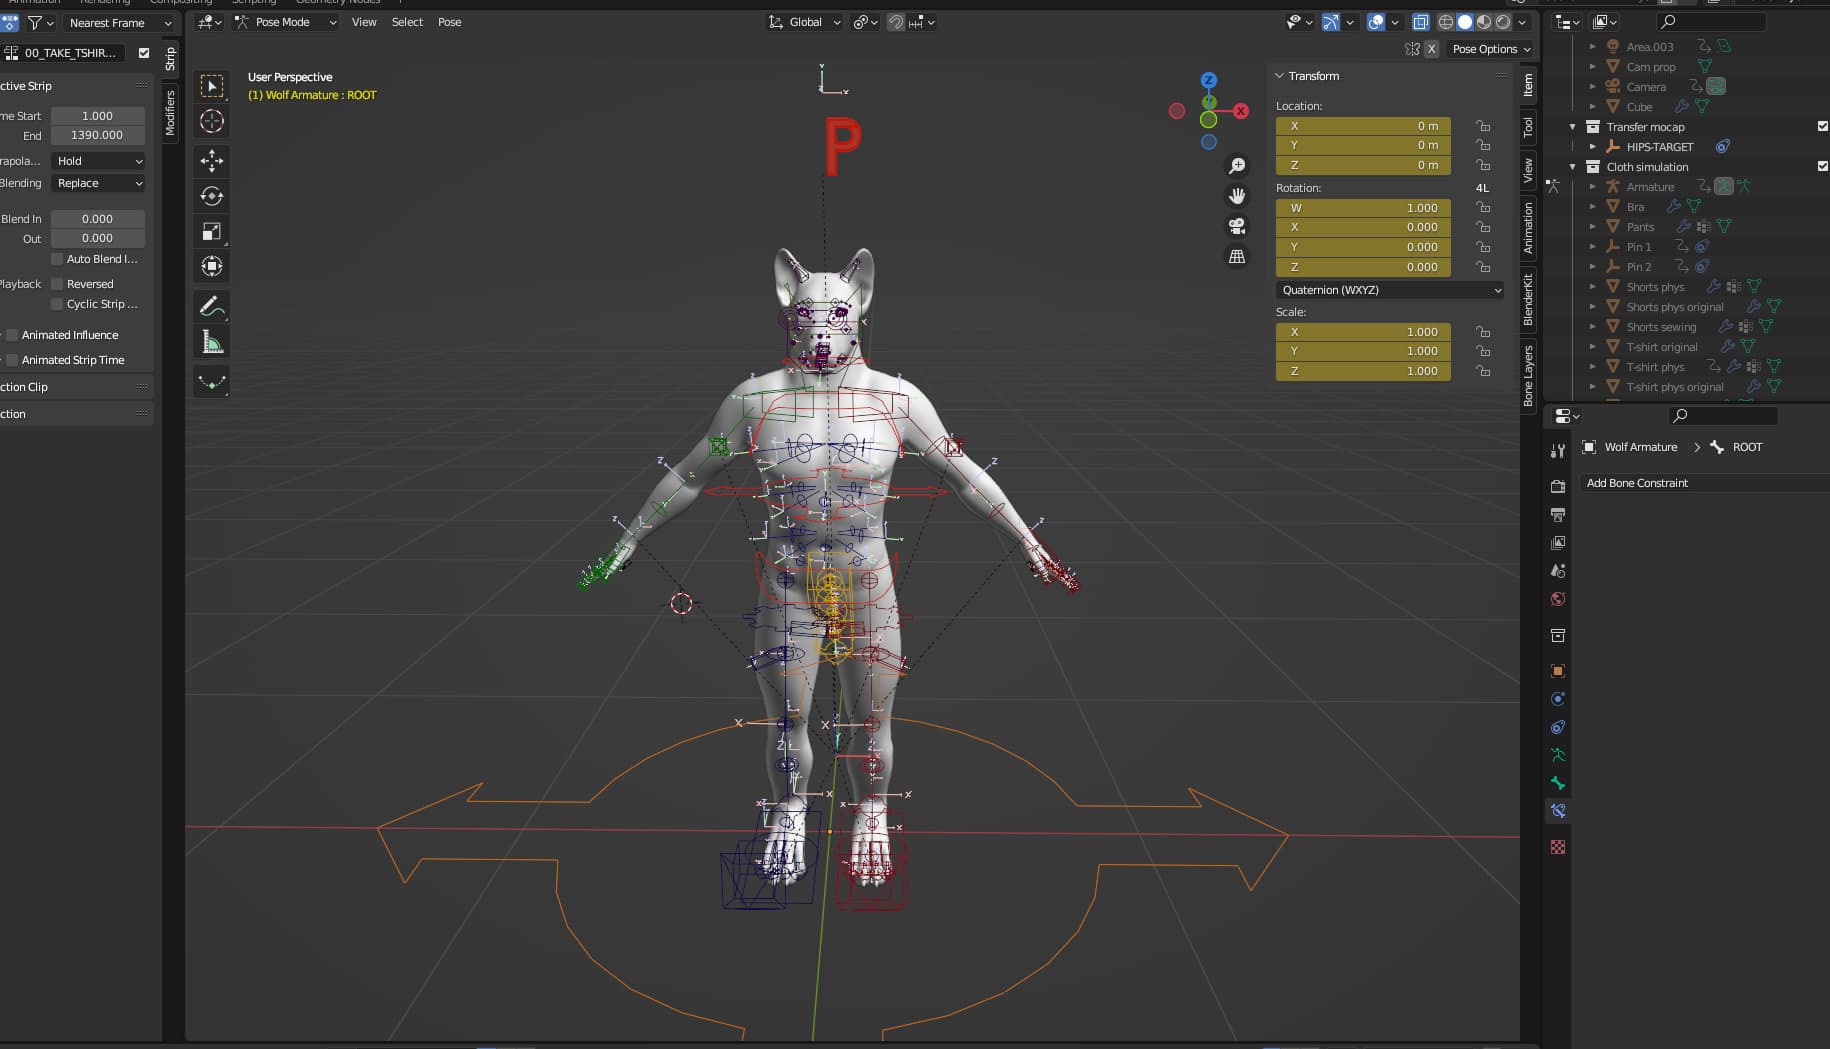
The armature is custom made. For the take-shirt-off animation, I had to add 4 new bones to the hands. 2 main bones with their own bone at the tip. This tip bone work as a force direction for bone constraints. These bones follow the hands and can be moved around independently from the hands. These bones are used for general grab interactions but in this case, they are used for the t-shirt.

The entire body mesh is using cloth physics for the soft body of the character. For the cloth physics, I use 2 weight maps to control how the cloth should behave in the different areas of the character.
One weight map control what part of the character that is pinned in place and follow the rig. The red areas indicates where the mesh is pinned the most and follows the rig when dynamic mesh is checked in the cloth sim. The black areas are where the mesh is free to move.

The other weight map controls the pressure, simulating the weight of the fat pressing against the skin. The red areas are for maximum pressure like the chest, arms back and so on. The belly and the buttocks are in the blueish colors, indicating it is more jiggly and softer than other parts of the body.

The cloth also simulates internal mass which I have set to 0.900 since it is the density of fat in Kg/L. This makes the drooping parts of the mesh heavier at the bottom.
There are many other settings in the cloth sim that determine how the body cloth sim will behave.

The t-shirt has its own armature consisting of two bones placed near the neck of the character. These bones do not follow the character rig, these was a temporary solution. These 2 bones are also placed close to the t-shirt mesh, due to how the pin constraints on the t-shirt works.

These 2 t-shirt bones work as pins for the t-shirt. And both bones have two bone constraints, a copy location and a dampened track (forces the t-shirt bone to point in the same direction as the hand grabber bone). These t-shirt bone constraints make the t-shirt bones follow the hand grabber bones when needed as the constraints influence can be activated with keyframes.
The t-shirt has a couple of shape keys, one for the size (scaling the entire shirt) and one for thickness (making the t-shirt wider at the bottom).

Grab the shirt.
I gave the t-shirt 3 vertex groups I have weight painted. One is called ‘Pin group’, used for the pin group function in the cloth simulation. Then there is one vertex group I have named ‘Pin 1’ this is used for the left hand grabber bone. The third vertex group is called ‘Pin 2’ which is for the right hand grabber bone.

The t-shirt uses two hook modifiers and two vertex weight mix modifiers. Hook modifiers attaches part of the cloth defined by, in this case, the ‘Pin 1’ and ‘Pin 2’ to their relevant hook object, in this case, two bones one for each pin vertex group. This is also used with the cloth pin function. The vertex weight mix modifier mixes two vertex groups together, but I have set it to subtract so vertex group named ‘Pin 1’ and ’Pin 2’ negates the ‘Pin group’ vertex group. When the ‘Pin group’ is negated by the two pin vertex groups, it releases the cloth from the t-shirt pin bones done by keyframing the influence of the vertex weight mix modifiers.

The shorts have a vertex group where I have painted the waist of the shorts red to make them stay on. I could do without it, but this is more reliable. The shorts are parented to the character rig so the waistband of the shorts could follow the hipbone. In this case the shorts have collision before cloth so the belly could rest on the shorts and make the simulation more stable.

The shorts have 2 shape keys. On to pull the front of the pants down to make room for the belly and one shape key for shorts size.

Preparing the animation. For the character body size, I use the characters thickness shape key set to 0.000 at frame 1 and 0.300 at frame 50. The real animation starts from frame 50. When the character expands with the cloth modifier and self collision active, the belly will roll out and rest on the thighs. The thighs will get squeezed together along with other body parts resting on or against each other. If the character started fat, parts of the cloth would intersect and stick together until the character moved in a way that pulls the intersected areas apart.

Insert video from frame 1 to 50 and a bit more.

The shorts starts with their thickness shape key set to a low value at frame 1 and then at frame 50 they have expanded to the desired size.

The t-shirt just starts big there was no need for anything special.

The character is posed in a t-pose to match the t-shirt.

31 Likes

Thanks for sharing your work here! This feels so natural to have it behave this way!

Do you think this method could work for a VRChat avatar? I’ve received an avatar, which doesn’t have a weight slider, and as you may guess if I’m on this forum… this would be appreciated! :eyes:
Never used blender before wednesday (2 days ago), and have been able to tinker a bit and set up a shape key, resculpt and have some more belly with a slider for now!

I still have a lot to learn, but your post kinda gives me an objective to aim at! Thank youuuu! <3
Could you perhaps share a blender file, even a simplified one, where you apply the same work? Or show how to configure the pressure, weight maps, stiffness and other settings in the Cloth physics settings?

2 Likes

You are very welcome. :smiley:

Just to clarify: the weight maps was just to simplify the vertex group function where you use weight paint to define how much a given vertex should be affected, in this case cloth movement simulation and cloth pressure. Vertex groups are commonly used for assigning mesh to bones in a rig. :smiling_face:

This method, character having cloth physics, sadly doesn’t work in game engines (at least not yet. Unity once had cloth physics but was removed because cloth physics is very processor demanding.) Even if game engines had cloth physics, this method would still not work as it uses Blender functions and methods.

For the jiggliness in games, bones are often used. I originally made my character to be used for a game made with Unity, so I made my rig with several helper bones to deform the fat. Unity have a paid add-on called Dynamic bones (I personally have used this one.) Link: Dynamic Bone | Animation Tools | Unity Asset Store where you can define jiggle bones for your character. It now looks like VRChat SDK comes with this function now.

For my character I made my rig with:

6 bones for chest area (1 bone for each breast, 2 bones, 1 on each side for the part of the breast that goes under the arms and 2 bones for shoulder blade area).

7 bones for upper half of the belly all the way to the back (3 for the upper part of the belly, 1 on each side for the rolls and 2 on the back).

7 bones for the lower half of the belly and all the way to the back (3 bones for the lower half of the belly, 2 bones for the side hip area one on each side and 2 bones for the back hip area.)

Then helper bones for the buttocks and 1 bone on each side of each thigh,

If you want to make a soft body character for animation in blender using cloth sim, there are some tips for the character mesh. Generally, it’s good keeping the mesh faces as quads and avoid having too many poles (Where a low or high number of faces connects with each other.). The reason, it’s difficult to deform properly when creating shape keys for expanding characters and cloth physics acts different in these areas. It’s also a good idea to keep the mesh as equally dense as possible, dense areas will be softer and weight more. If the character contains loose geometry like mesh fur/hair that isn’t part of the character/object you want to be jiggly, they will usually fall off. Unless the geometry is their own object and parented to the character rig, they won’t fall off but won’t follow the jiggling surface of the character either. When I created my character for cloth physics, I made it so only the skin surface is there. You kind of have to treat the surface of the character as the actual skin of the character.

The cloth pressure acts as the weight of the fat under the skin cloth. Here you can use vertex groups, which is configured using weight painting, to define how much pressure there is under the skin cloth in the different areas. Here you also find the function to add internal fluid of the cloth, this makes the cloth acts like it contains fluid.

The Pin function in cloth settings in Blender is where I have assigned a vertex group do define where the cloth skin is attached to the rig.

The stiffness of the cloth skin and other stuff. Generally, the denser the geometry the more it weights and softer and bendier it becomes. So if the skin is dense and shouldn’t fold like silk, you have to increase the stiffness of the cloth and probably lower the vertex weight in cloth settings. And if you have self collision turned on, the distance should also be lowered. If it is set too high, it will jitter and become unstable. The reason, each vertices have a small collision sphere attached to it, so if the distance (radius for each sphere) is too high, each sphere collider will collide with each other.

The scale of the character can affect the behavior of how the cloth skin behaves.

I hope it makes sense or can give a sense of direction. This was “quickly” written. xD

I am probably going write a more or less complete guide on how to create fat characters with cloth physics and tips to create belly overhang and fat folds with a character example in the future. x)

3 Likes

This was fantastic thanks so much for not only making an impressive character but also sharing how you made it. I am looking forward to your complete guide, however I would highly encourage you to post drafts in case writing that out is going to take a lot of time to finish. It can always be easily compiled and edited at the end (I’d like to know more as soon as I can). I posted some questions below, feel free to respond in whatever capacity you are comfortable with.

  1. When you describe your custom rig for games are the additional bones for fat also helpful for the cloth simulation or are they completely unrelated?

  2. Could we get a preview of the weight painting of the fatty areas? I’d like to compare them with mine, right now I just have 1 bone for top belly, 1 for lower belly, and 2 for the butt.

  3. Since reading your post I have been looking at how other artists apply cloth sims. Is it correct to say the main difference with us is that since our characters are so big it makes sense to just make the whole character’s mesh a cloth sim rather than selectively applying constraints for butt and boob bones using cloth sim like in the video here? MMD Rigging model 01 03 Part 5 Butt physics - YouTube

  4. Okay so for my real question. I am looking for advice on how to proceed with my character.

  • For a game asset is sounds like I make one version with more fat jiggle bones.
  • If I am looking to do animated shorts I should just go with cloth sim (the extra fat bones being unnecessary?).
  • And a third short term case being I would like to create posed renders of my character that I could do digital paint overs with and/or use AI on. For this last case it sure would be nice to have a character mesh that would deform to the environment and self collide to save time on doing shape keys. So the question is does the cloth sim make it a nightmare workflow to pose characters? Creating shape keys for poses shouldn’t be problem either. Below I posted an example pose of an unsightly roll deformations, not the best way to tackle it.
    (Forgive the missing hair, I need to remake the hair particle system to follow my rig).
2 Likes

Thank you so much and you are welcome Full_C. :smiley:

Yeah it takes some time to write all that, and I usually write a draft in a word document in case the web browser crashes or times out. I did experience that once x).

I imagine I’ll post it in bits. :slight_smile:

The additional bones can be useful for parts of your character where you want more control over the cloth simulation. In my case I don’t really use the additional controller bones to deform the fat when I use cloth physics. I only use them for game engines and manual pose when I don’t use physics. But these helper bones are mostly what deforms the torso mesh when the character bend the spine.

1 Like

For the torso I have these 20 helper bones so I can control the fat areas. I have selected a bone so you can see how I weight painted it.

These two bones control the upper and lower rolls.

Each helper bone bleed into the next helper bone influence area so it gets a smooth transition when rotating the bones.

2 Likes

I would say the mentioned method is a lightweight method, as a very small amount of geometry is physics calculated, and easier to work with.

Personally I used cloth for my character, because I wanted the fat areas to jiggle, deform and interact with each other and as well as props. I also wanted to be able to make the character lift their own belly. And it works for all body sizes. At least in my case. :smiley:

I did experiment with the cage method where you bind the character mesh to the cage mesh with internal structure, and give the mesh with internal structure cloth sim. It’s a okay method when you only have small parts you want to jiggle. I did try for the entire character once, I cannot recommend it. xD

1 Like

When doing cloth physics on a whole 15k mesh does you blender take a significant hit? Is it laggy as you are trying to animate/pose? I ask because my model has about 40k quads.

When creating the obesity shape keys what was your workflow? Did you duplicate your thin character mesh, sculpt weight onto it(increasing polycount as necessary) and then create a shape key from the original 15k mesh that wrapped around your obese character sculpt, or did you just sculpt straight from the original?

I need to go in the reverse order, having started with a higher polycount that one would want for accommodating the rolls. I am wondering if I should make a separate thin and buff sculpt and if so what the most efficient way to transfer that to a shape key would be.

  • Yeah, for a game asset you can create more fat jiggle bones where you need it.
  • For animated shorts you can use cloth sim for your character. You can use the extra fat jiggle bones for extra control for for example the breast and butt. Maybe you can combine cloth physics with Bone dynamics pro addon or the bone constraint method you mentioned MMD Rigging model 01 03 Part 5 Butt physics - YouTube for bras or something like that.
  • It’s normal for blender to run slow when applying cloth physics to an object. When I researched cloth physics I used low poly and simple shapes to keep blender fast. And just to be sure that blender isn’t the only program that runs slow with cloth physics, I found a video where a person applies soft body for a character in Houdini Houdini Tutorial - Vellum Booty Shake (FREE EXTENDED VERSION) - YouTube and found that Houdini also takes a hit in performance. A side note: The way Houdini creates volumetric soft bodies is by generate an internal structure called tetrahedralization. Link to Houdini vellum geometry node guide: Vellum Constraints. I have seen a developer talk about tetrahedralized mesh generation for blender at Google summer of code. Tetrahedralized mesh gives the mesh an internal structure, so the mesh behaves like a mass. User:AarnavDhanuka/GSoC2022/FinalReport - Blender Developer Wiki

  • My workflow for the obesity shape, was that I started out with having my thin character with few polygons for better management. As I began to expand my character, I added loop cuts where it was necessary on the base shape to increase polygons in the needed areas, such as the belly, breast and butt area and then smooth the additional geometry out for the different shape keys (In this case ending on about 15k mesh). I did try sculpting, but it had the tendency to not be symmetrical, even with symmetry applied. So I used proportional editing a lot, but when using this on the inside of the thighs, it can manipulate the other thigh and make the mesh asymetrical, so I had to be very careful here.

I need to go in the reverse order, having started with a higher polycount that one would want for accommodating the rolls. I am wondering if I should make a separate thin and buff sculpt and if so what the most efficient way to transfer that to a shape key would be.

  • This is something I don’t have experience with. Some people say they create a thin shape key. I would probably create a low poly lean body, then duplicate that and remove half of the mesh and give it a mirror modifier and then shape the duplicated mesh after the high poly fat body, while having a shrink wrap modifier + set snap to face project. You can apply this new shaped mesh as a shape key on the lean shaped body mesh if it has the same poly count.

A method I’m thinking to try out is to duplicate a version of the same character, one for each body shape key, and then apply their shape as a shape key for the original mesh, but it has to have the same amount of geometry. I feel this method is most useful when having the desired amount of polygons.

Will do, when I can find the time :smiley:

I need some help with this, I’m working on blender to do a weight gain animation of a girl starting thin and getting big, my problem is with the physics, I want the fat to move and have interactions with the clothes and the hands of the character, to do so I’ve been using a cloth simulation applied in pieces of low poly mesh and attaching them to the body with the surface deform modifier, getting decent results but that only works for small areas like breast and butt, I’ve been trying to generalize the method but the results aren’t good
is there a video tutorial that I can see? I read all you write before but it’s hard to understand what to do with only text

1 Like

Could you describe or show what looks off?

Here are some resources I used that may help you.

https://twitter.com/lewdineer

https://vxtwitter.com/ExtrudedS/status/1701318460242841847

Also make sure that you are weight painting the vertexes so that the right parts are less or more influenced by the physics.

1 Like

Also it may be worth reaching out and picking this artists’ brain. They had a post describing some of the process on Twitter which got nuked sadly. But I believe it was done in a similar way.

1 Like

This guide was really nice. Thanks for posting it.

Interesting. I thought that once you started adding shape keys you couldn’t add geometry any more? Like, can’t do a loop cut after the basis blend shape is made. Has that changed? I always run into the same thing where I need more geometry to get the character into the right shape, or I start from a big character and don’t like how the model fits together when they’re shrunk down. I tried the model-fat-and-shrinkwrap-to-skinny approach but got some bad joins. Maybe I just need to keep making the models over and over again.

1 Like

Something that I can’t really get blender to do, is having clothes (that only have cloth physics applied to.) interact with the body with cloth physics applied to interact properly with each other.

Side info: The corridor crew on youtube made a video where they simulated Hulk tearing his pants. It was a pretty advanced node setup in Houdini to get clothes react to the body mesh and the body to react to the clothing.

Currently the way I do it, is that I first bake the body clothing simulation. Then I simulate the clothing afterward that react to the body. In the modifier stack for the character I have Armature then Cloth then Collission then Subdivision.

For the bra, the modifier stack is Armature then Cloth then Collission then Subdivision

If I want the body to react on clothing, I add the clothing to the rig like normally done with vertex groups and all that. Then I add a vertex group (called Pin or what you like) and weight paint what part of the clothing that needs to be pinned in cloth physics (Remember to check Dynamic Mesh.) In my case I have weight painted it with 50% weight.

That way the bra still has a bit of cloth physics making it somewhat stable but you still have to control it a bit with the rig it’s applied to, possibly a pair of bones that only affect the bra. At the moment I do it for only the waist band on pants and for bras.

To have a more reliable hand interaction with the cloth physics body mesh, you can duplicate the hands mesh with a bit of the lower arm, give it a shape key where you make it a bit thicker. Also, if the finger tips are very pointy, it can poke through the cloth mesh. Then give the separate hand mesh a collider and remember to remove unnecessary modifiers.

I hope it can help a little ^^

When you have shape keys, you can add a loop cuts and such in the latest versions of blender. Early versions of blender it could really mess with the mesh when adding extra geometry.

It can be really difficult to shrink a character back down from extremely big. Often the mesh density is fit for a given large body part, and shrinking it down suddenly makes the mesh super dense and very hard to manage.

For your characters body, if you start large, you have to try out different ways to scale the parts down. Proportional editing and change that to connected only when needed is pretty good to use.
SkĂŚrmbillede 2024-01-12 154228

This changes EVERYTHING. I was so used to loop cuts messing up shape keys I never tried it again, but now… :open_mouth:

1 Like

It’s really nice it works now. In blender 3 it would still complain that it wasn’t recommended but it would work. In Blender 4, it seems to totally accept loop cut for shape keys, as the warning doesn’t show anymore. :smile:

1 Like